How to Use a Digital Bore Gauge: A Step-by-Step Guide for Accurate Measurements
When it comes to achieving precision in internal diameter measurements, a digital bore gauge is one of the most reliable tools available. Whether you’re working in automotive machining, metal fabrication, or any mechanical engineering application, knowing how to use a digital bore gauge properly ensures accurate and consistent results.
In this step-by-step guide, we’ll explain what a digital bore gauge is, why it’s essential, and how to use it effectively for high-precision internal measurements.
What Is a Digital Bore Gauge?
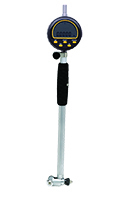
A digital bore gauge is a measuring instrument designed to check the internal diameter of holes, cylinders, or pipes. Unlike traditional dial bore gauges, a digital version features an easy-to-read display and often offers data output capabilities, making it ideal for both professionals and enthusiasts looking for efficient and accurate readings.
Benefits of Using a Digital Bore Gauge
- High precision: Measurements accurate to 0.001 mm or better
- Digital readout: Eliminates reading errors common in analog tools
- Time-saving: Fast measurements with minimal setup
- Data logging: Some models allow storage or transmission of measurement data
Step-by-Step: How to Use a Digital Bore Gauge
1. Prepare the Workpiece and Gauge
Before taking any measurements, ensure that the bore or hole is clean and free of debris, oil, or burrs. Similarly, inspect your digital bore gauge for damage and confirm that the battery is charged and the screen functions correctly.
Tip: Let the workpiece and the gauge acclimate to room temperature to avoid thermal expansion errors.
2. Zero the Gauge with a Master Ring or Setting Ring
To ensure accurate measurements, you must first calibrate the gauge using a master ring gauge or a setting ring of a known internal diameter.
- Insert the measuring head into the ring gauge
- Rock the bore gauge slightly to find the minimum reading
- Press the “zero” button on the digital display while at the minimum value
This step sets your gauge to a reliable reference point.
3. Insert the Bore Gauge into the Hole
Hold the gauge by its insulated grip and gently insert it into the bore to be measured. Make sure the measuring anvils are aligned with the axis of the hole.
4. Rock the Gauge to Find the Minimum Reading
Once inserted, slowly tilt or “rock” the gauge side-to-side and front-to-back. This action helps you find the true minimum reading, which corresponds to the exact internal diameter of the bore.
The digital display will show fluctuating values. The lowest value is the one to record.
5. Record or Save the Measurement
Once you find the minimum value, either record it manually or use the data output feature (if available) to log the measurement. If you’re checking for tolerances, compare the measurement against the desired specifications.
6. Repeat as Needed
For reliability, take multiple measurements at different depths or positions within the bore. This helps identify any out-of-roundness or tapering, which can affect part performance.
Common Mistakes to Avoid
- Not zeroing the gauge before use
- Measuring a dirty or deformed bore
- Skipping the rocking motion, which results in inaccurate readings
- Using excessive force during insertion, which can damage the bore or gauge
Maintenance Tips
- Always store the gauge in a protective case
- Clean measuring contacts after each use
- Replace batteries regularly
- Recalibrate periodically using certified gauge blocks or rings
Learning how to use a digital bore gauge is essential for anyone involved in precision machining or quality control. By following this guide, you can ensure consistent, accurate, and repeatable measurements every time.
If you’re looking for high-quality digital bore gauges and other precision tools, trust Can Star Industrial, your reliable partner in industrial and metrology solutions.